![Projul Logo 345PX wide.png]](https://knowledge.projul.com/hs-fs/hubfs/Projul%20Logo%20345PX%20wide.png?height=40&name=Projul%20Logo%20345PX%20wide.png)
(Return to table of contents)
Step-by-step user instructions to connect a Projul account with QuickBooks Desktop.- Note: QuickBooks Desktop 2020 or above is required for this integration. To download the latest version from the official Intuit (QuickBooks) website, click here.
- For the QuickBooks Online integration document, click here.
1.1 Log in to Projul
- Log in to Projul using the following link (app.projul.com). After successful login, you will be redirected to the Projul dashboard.
- If you don’t have a Projul account yet, you can book a demo here.
1.2 Go to the Integrations Page
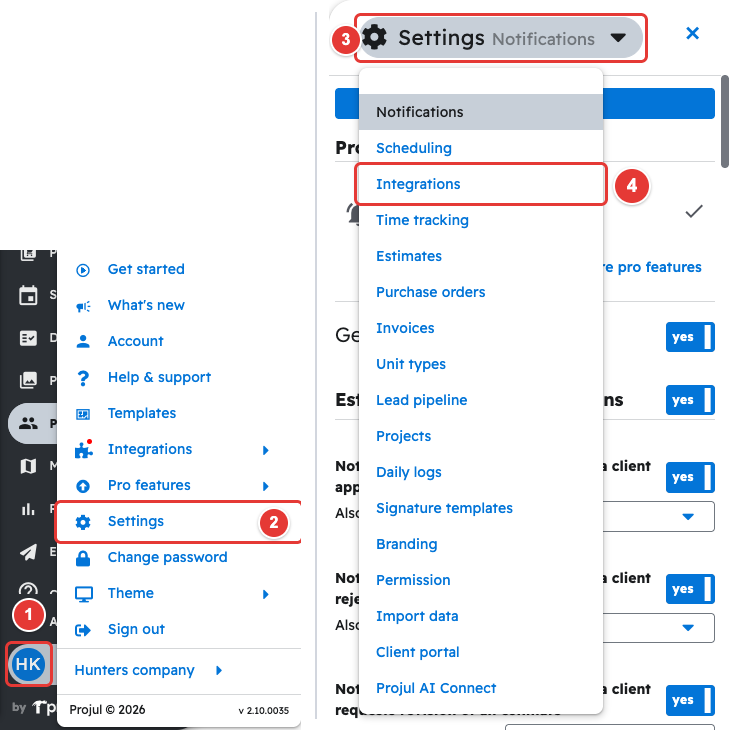
To get to the Integrations page:
- Click on account / initials in the bottom left corner of your Projul navigation bar.
- Click on settings.
- Click the settings dropdown menu on the sidebar.
- Select integrations.
1.3 Install Projul Sync Manager Application
There are two integration options: QuickBooks Online and QuickBooks Desktop.
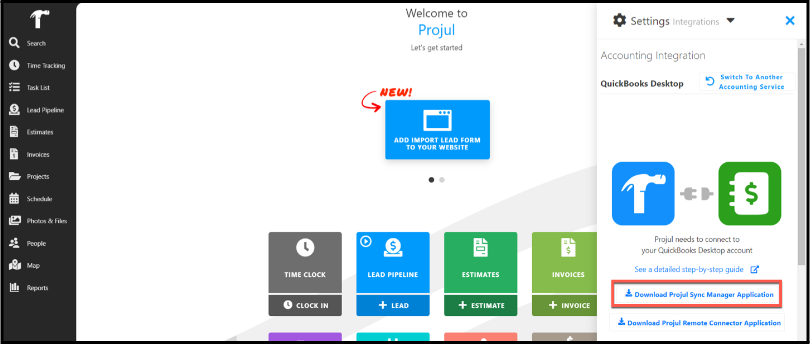
- Click on QuickBooks Desktop.

- Download the Projul Sync Manager Application on the same computer as QuickBooks Desktop. You can download the Projul Sync Manager from Projul (screenshot below) or by clicking here.
- Note: The Projul Sync Manager Application must be installed on the same computer as QuickBooks Desktop is installed.
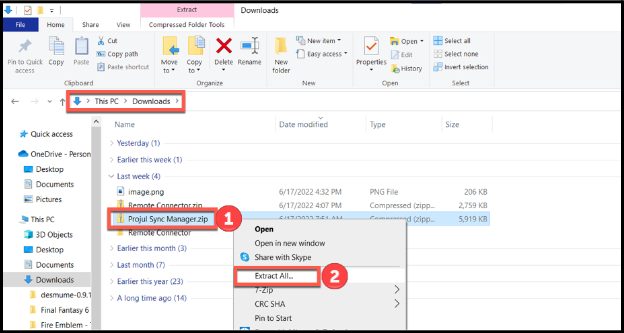
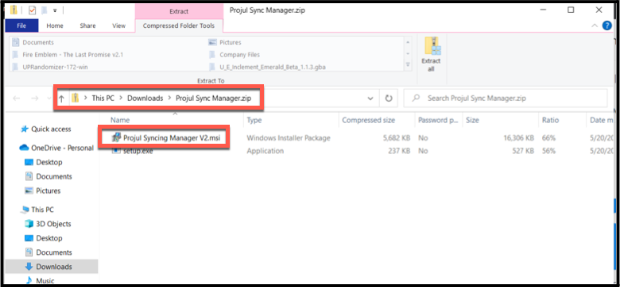
- Find the downloaded Projul Sync Manager Application file (it will be in the downloads folder unless another folder was selected for the download), then:
- Right click on the file.
- Click Extract All.
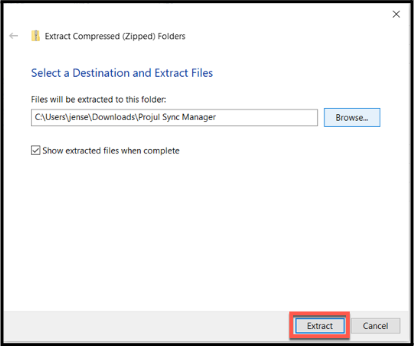
- Click the extract button.
- Find and double click the extracted Projul Sync Manager V2 file (it will be in the downloads folder unless another folder was selected for the download).
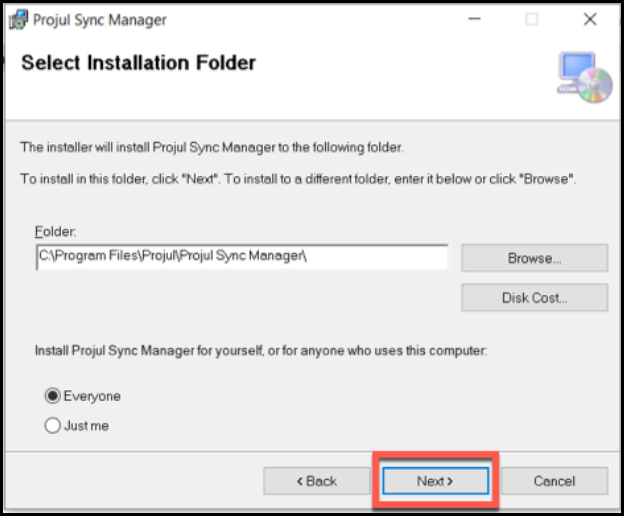
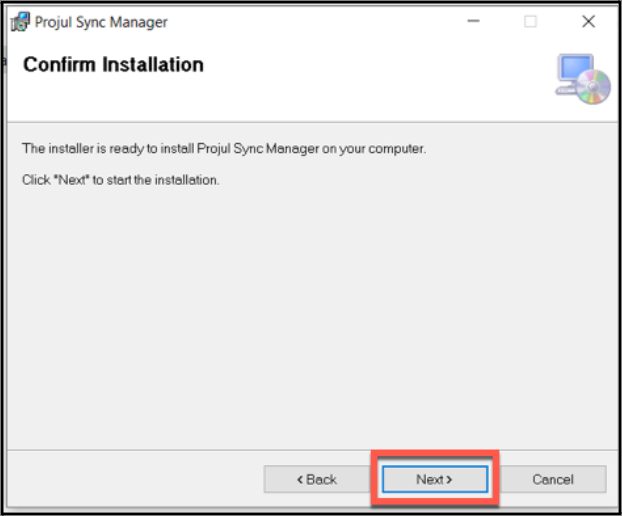
Follow the installation prompts.
- Note: During the installation you may be asked if you want to install C++ on the computer. Click yes if that occurs.
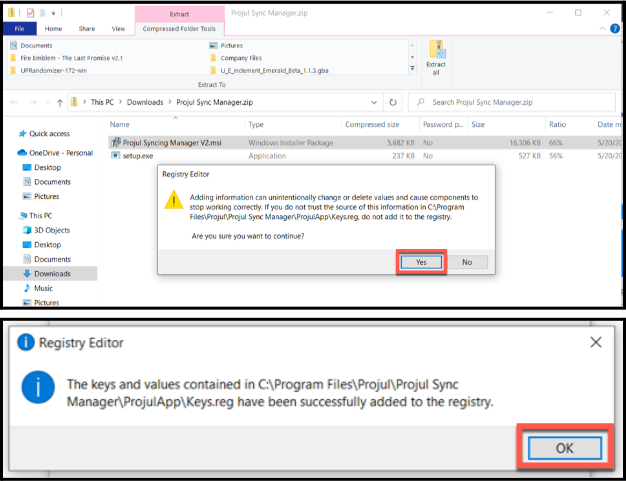
- Allow the Projul Sync Manager to update the registry.
1.4 Install Remote Connector for QuickBooks
The Intuit Remote Connector for QuickBooks must also be installed in order to integrate Projul with QuickBooks Desktop.
- Navigate back to the Projul Integrations page and download Projul Remote Connector Application link. You can download the Remote Connector from Projul (screenshot below) or by clicking here.
- Note: Remote Connector must be installed on the same computer as QuickBooks Desktop is installed.
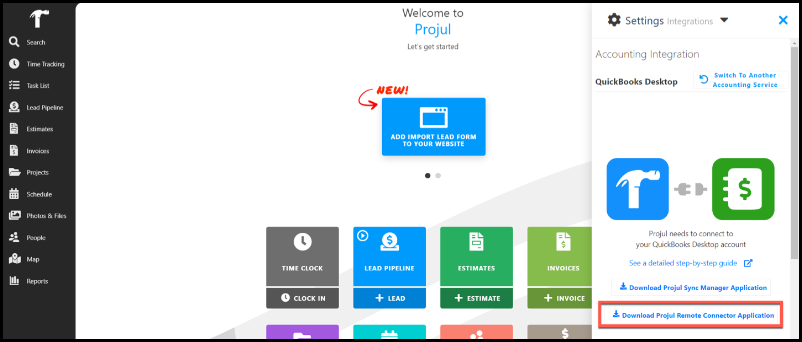
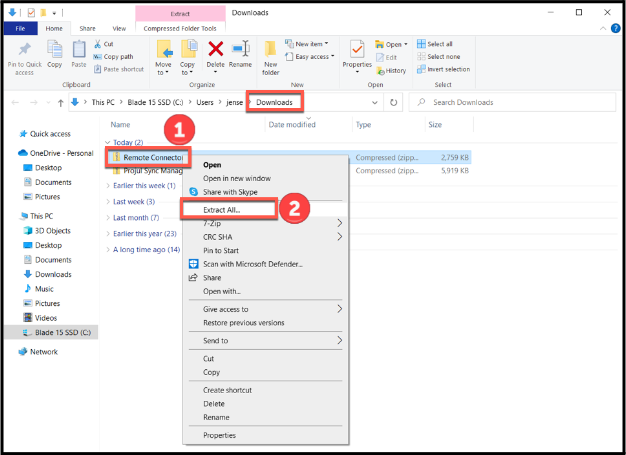
- Find the downloaded Remote Connector file (it will be in the downloads folder unless another folder was selected for the download), then:
- Right click on the file.
- Click Extract All.
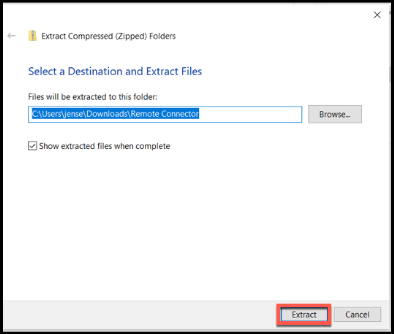
- Click the extract button.
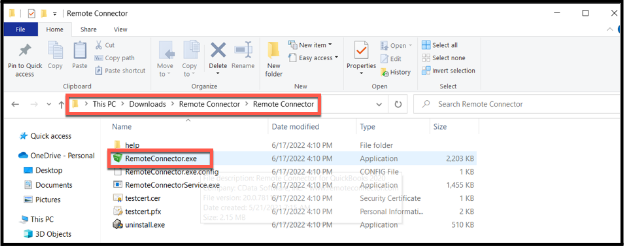
- Find and double click the extracted Remote Connector file to install and open the program (the file will be in the downloads folder unless another folder was selected for the download).
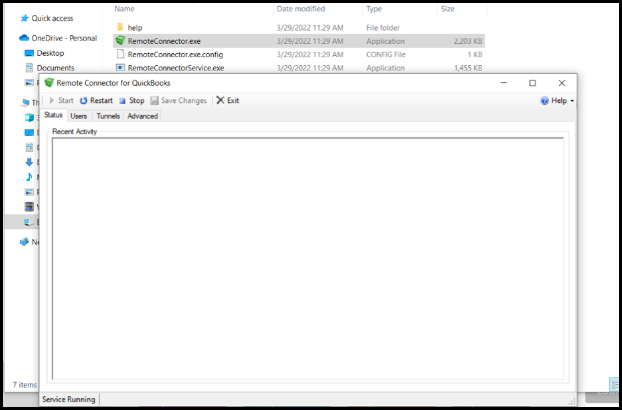
1.5 Set Up Remote Connector for QuickBooks
Now that it is installed, the Intuit Remote Connecter for QuickBooks must also be set up.
- Open Remote Connector for QuickBooks
- Note: QuickBooks Desktop MUST also be open for this setup process.
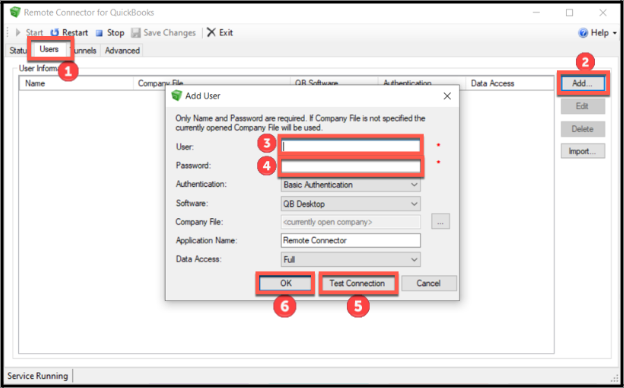
- Open the add new user screen:
- Click on the Users tab.
- Click the Add button.
- Enter an administrator in QuickBook's Username.
- Enter that user's Password.
- Click the Test Connection button.
- Click the OK button to finish creating the new user.
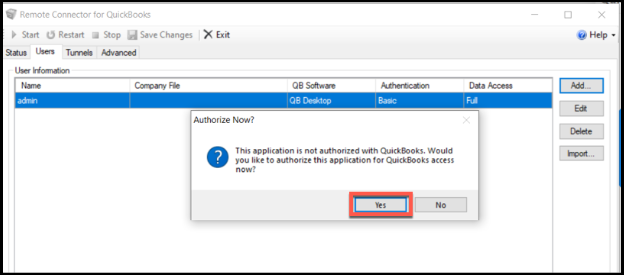
- Click Yes on the popup to authorize Remote Connector to access QuickBooks.
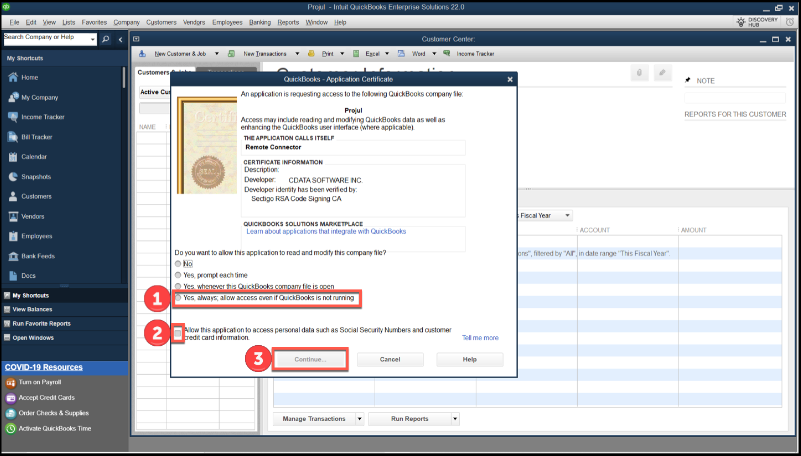
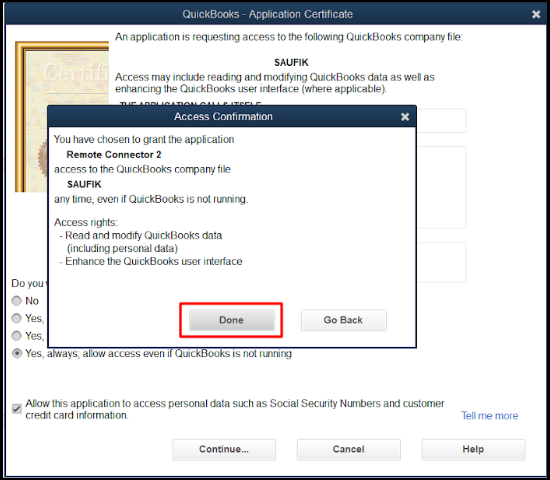
- After the user accepts authorization, the QuickBooks authorization certificate will display automatically. Use the following steps to complete the integration authorization in QuickBooks.
- Click the radio button, “Yes, always; allow access even if QuickBooks is not running.” A popup will appear asking for verification. Click Yes on the popup.
- Check the checkbox to Allow this application to access personal data….
- Click Continue.
- Click Done on the Access Confirmation popup.
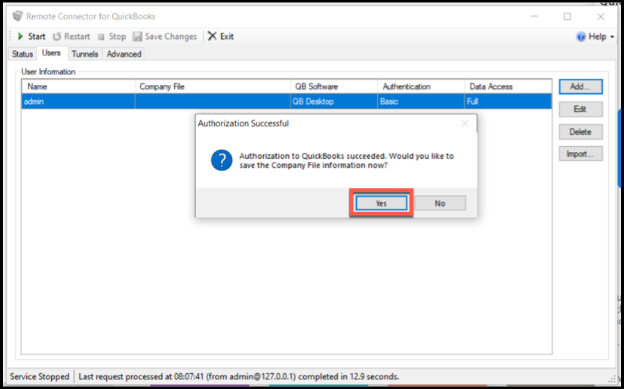
- Navigate back to the Remote Connector screen.
- Click Yes on the Authorization Successful popup, which will complete the process of adding a new user with the appropriate permissions.
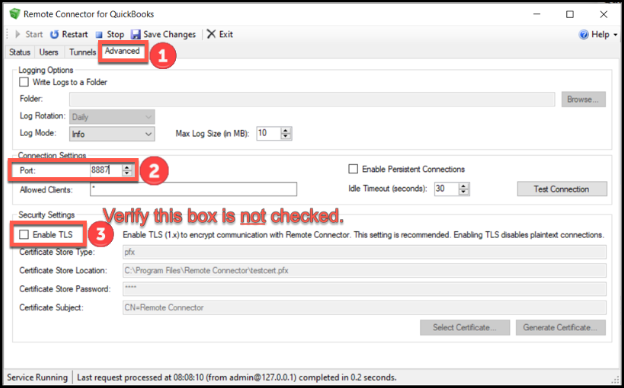
- After adding a new user:
- Go to advanced settings
- Find the port number. The port number will be needed to connect Projul to QuickBooks Desktop.
- Make sure Enable TLS is not checked.
1.6 Connect the Projul Sync Manager
With the port number from the prior step, the Projul Sync Manager can now be connected. Return to the Projul Integrations page.
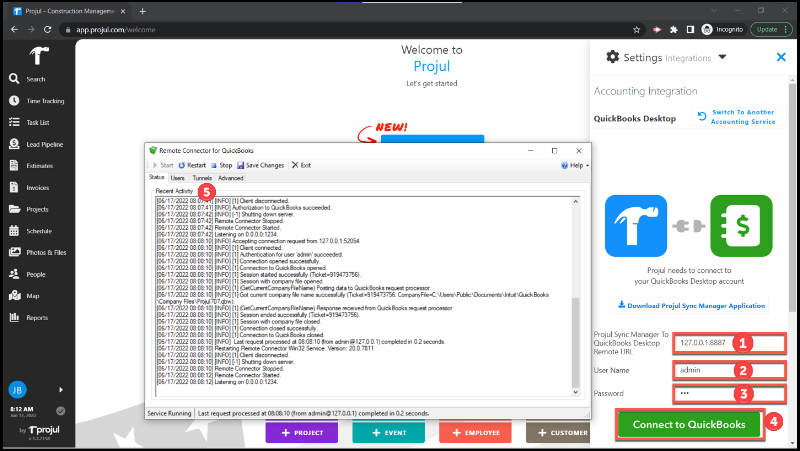
- Enter the following information:
- Remote URL: URL: 127.0.0.1:8887. The last part of the number (8887) is the port number. The port number was provided in the previous step (Remote Connector→Advanced→Connection Settings→Port).
- User Name: Enter the username used for the remote connector.
- Password: Enter the password used for the remote connector.
- Enter the Remote URL, User Name and Password from the Remote Connector, then open the Projul Sync Manager app and log in. The Integrations page shows "Connected" once the connection works.
- Connection activity will display in the Remote Connector screen confirming the connection.
- Note: Both the Projul Sync Manager and Remote Connector can run in the background and do not need to have the popup open for the sync to run.
The QuickBooks Desktop company account has now been connected to Projul!
1.7 Disconnection
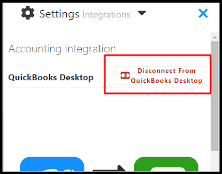
To disconnect Projul from QuickBooks, click the disconnect button in the Projul Integrations page.
2. Data Type Sync Selections
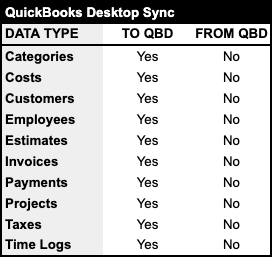
For QuickBooks Desktop, data syncing is one-way (from Projul to QuickBooks Desktop). The following data types may be synced to QuickBooks Desktop.
Only data types selected/checked in the Integrations page of Projul will be synced.
2.1 Types of Syncing (Manual vs Automatic)
There are two types of syncing: manual and automatic.
2.1.1 Manual Syncing
To sync data manually, go to Settings > Integrations and click "Sync on Request". This button shows when "Auto Sync" is off. "View Logs" sits next to it.
2.1.2 Automatic Syncing
Turn on the "Auto Sync" toggle in Settings > Integrations and click "Save Integration". Projul then syncs your selected data on a schedule. The first sync is scheduled after you save, and each sync schedules the next one.
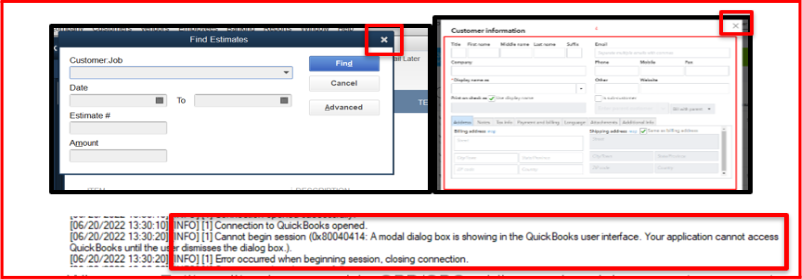
- Note: Data entry screens in QuickBooks must be closed while syncing, or the sync may fail and an error will display in the Remote Connector for QuickBooks.
2.2 Sync Icons
Projul has four sync statuses represented by the following icons.
 |
Pending Data Sync |
 |
Data Not Synced (Sync Error Occurred) |
 |
Some Data Types Synced |
 |
Data Synced |
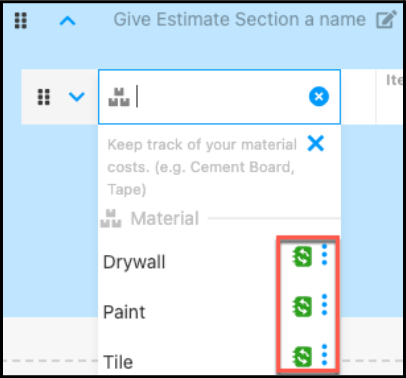
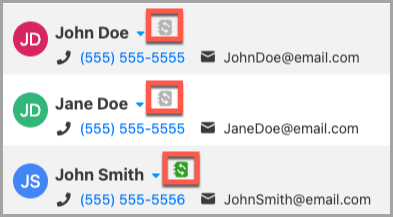
Data items selected to be synced on the Integration page, as noted in the previous section, will display one of these icons by the data as illustrated in the examples below.
- Note: Once the system finishes syncing, the webpage may need to be refreshed to see the changes.
Examples:
Screenshot example of the sync icon (pending sync) for the cost line item data.
Screenshot example of the sync icon (data synced) for the customer data.
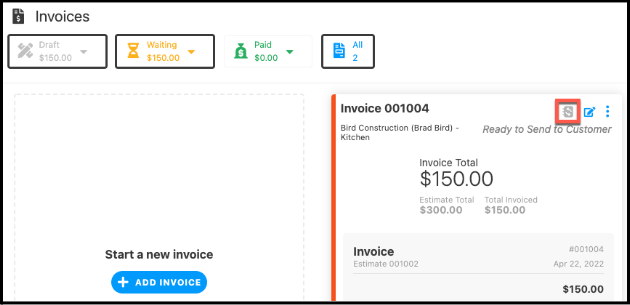
Screenshot example of the sync icon (pending sync) for the invoice data.
3. Sync Details by Data Type
The rest of this document will provide sync details for each of the data types in the list below. As stated previously, data syncing is one-way for QuickBooks Desktop (from Projul to QuickBooks Desktop). The chart below shows the data types that may be synced.
3.1 People
Projul offers three types of people roles that correspond to the QuickBooks customer. Two of the three may be synced between Projul and QuickBooks Desktop.
- Customers
- Employees
- Contractors (not synced)
Customers are generally added while creating a new project OR separately in the People menu.
3.2 CustomersProjul customer data syncs to QuickBooks Desktop fields as follows.
|
Sr. No. |
Projul Field |
QuickBooks Desktop Field |
|
1. |
First name |
First name |
|
2. |
Last name |
Last name |
|
3. |
Phone |
Main Phone |
| 4. |
Company Name |
Company Name |
|
5. |
Display Name |
Customer Name |
|
6. |
|
Main Email |
| 7. |
Primary Address |
Invoice/Bill to |
|
8. |
Notes |
-- |
Projul employee data syncs to QuickBooks Desktop fields as follows.
|
Sr. No. |
Projul Field |
QuickBooks Desktop Field |
|
1. |
First Name |
First Name |
|
2. |
Last Name |
Last Name |
| 3. |
Phone |
Main Phone |
| 4. |
|
Main Email |
|
5. |
Cost rate |
--- |
| 6. |
Notes |
Description |
|
7. |
Hire Date |
Hire Date |
| 8. |
Birthday |
Date of Birth |
| 9. |
Home address |
Address |
| 10. |
Labor name/Type |
Item Name |
| 11. |
Pay rate |
Hourly Rate |
Example:
The following link details how to add a new employee.
How do I add an Employee/User or Contractor in Projul?
3.4 ProjectsWhile Projul is designed to be project-centric, every project requires a customer. As such, project sync is dependent on the customer data syncing. If the customer data is not synced, project syncing will not work.
Projul project data syncs to QuickBooks Desktop fields as follows.
|
Sr. No. |
Projul Field |
QuickBooks Desktop Field |
| 1. |
Project Name |
Full Name |
| 2. |
Customer Name |
Job Name |
|
3. |
Project Notes |
Job Description |
| 4. |
Project Type |
Job Type |
| 5. |
Start Date |
Start Date |
|
6. |
Completion Date |
Projected End Date |
|
7. |
Customer Contact Number |
Main Phone |
|
8. |
Additional Project Phone |
Main Email |
|
9. |
Project Address |
Address Detail |
Example:
The following link details how to create a new project.
https://knowledge.projul.com/how-do-i-create-a-new-project-lead
3.5 Time LogsTime log sync is dependent on the employee data syncing. If the employee data is not synced, time log syncing will not work.
- Note: If user syncing is on auto-sync, then syncing will start when the user approves the time log.
- Note: Pay rate syncing works for new pay rates only.
For time log data, Projul fields sync to QuickBooks Desktop fields as follows.
|
Sr. No. |
Projul Field |
QuickBooks Desktop Field |
| 1. |
Project |
Project |
| 2. |
Pay Rate |
Payroll |
| 3. |
Duration |
Duration |
| 4. |
Notes |
Notes |
| 5. |
Employee Name |
Employee Name |
Example:
The following links detail how to enter time, approve a time log and manage pay rates.
Time Logs
https://knowledge.projul.com/how-to-add-or-edit-a-time-log-as-an-admin
Pay Rates
https://knowledge.projul.com/how-do-i-use-pay-rates
3.6 CategoriesThere are three types of categories in Projul, and all will sync from Projul to QuickBooks Desktop.
- Labor
- Materials
- Other Costs
Example:
The following link details how to create an estimate with costs at the category level.
How to add, edit, or remove saved Cost Line Templates
3.7 CostsIn Projul, the three categories above may be broken out into various cost line items. For example, materials could include drywall, paint, or steel.
The different cost categories have varying mandatory fields that must be completed in order for syncing to occur.
3.7.1 Labor Costs
Projul labor costs sync to QuickBooks Desktop fields as follows.
|
Sr. No. |
Projul Field |
QuickBooks Desktop Field |
| 1. |
Labor Name |
Item Name/Number |
| 2. |
Product Image |
---- |
| 3. |
Labor Category |
Sub-Product/Service |
| 4. |
Default Cost per FT |
Cost |
| 5. |
Default Markup per FT |
Sale Rate |
| 6. |
Taxable |
Tax Code |
| 7. |
Description |
Description |
3.7.2 Material Costs
Projul material costs sync to QuickBooks Desktop fields as follows.
|
Sr. No. |
Projul Field |
QuickBooks Desktop Field |
| 1. |
Material Name |
Item Name / Number |
| 2. |
Product Image |
---- |
| 3. |
Vender |
Preferred Vender |
| 4. |
SKU |
Manufacturer’s Part Number |
| 5. |
Material Category |
Sub-item of |
| 6. |
Default Cost per Unit |
Cost |
| 7. |
Default Markup per Unit |
Sale Rate |
| 8. |
Taxable |
Sale Tax |
| 9. |
Default Description |
Description |
3.7.3 Other Costs
Projul other costs sync to QuickBooks Desktop fields as follows.
|
Sr. No. |
Projul Field |
QuickBooks Desktop Field |
| 1. |
Cost Name |
Item Name/Number |
| 2. |
Product Image |
--- |
| 3. |
Default Cost per Unit |
Cost |
| 4. |
Default Markup per Unit |
Sale Rate |
| 5. |
Taxable |
Tax |
| 6. |
Default Description |
Description |
Example:
The following link details how to create an estimate with costs at the cost line item level, as well as how to Remember Labor / Material / Other Cost as Template which is required for cost line item syncing.
How to add, edit, or remove saved Cost Line Templates
3.8 TaxesProjul tax data syncs to QuickBooks Desktop fields as follows.
|
Sr. No. |
Projul Field |
QuickBooks Desktop Field |
| 1. |
Tax Name |
Sales Tax Name |
| 2. |
Tax Percent |
Tax Rate |
Example:
The following link details how tax rates work in Projul.
How do discounts and tax rates work in Projul?
3.9 EstimatesEstimate sync is dependent on multiple other data types syncing. If the following data types are not synced, estimate syncing will not work.
- Categories
- Costs
- Customers
- Projects
- Taxes
Projul estimate data syncs to QuickBooks Desktop fields as follows.
|
Sr. No. |
Projul Field |
QuickBooks Desktop Field |
| 1. |
Customer Name |
Customer |
| 2. |
Project Name |
Customer Job |
| 3. |
Customer Address |
Name / Address |
| 4. |
Company Address |
--- |
| 5. |
Company Email |
--- |
| 6. |
Estimate Date |
Date |
| 7. |
Estimate Expire |
--- |
| 8. |
Estimate Number |
Estimate # |
| 9. |
Contract Details |
Customer Message |
| 10. |
Attached Photo/Files |
Attached Files |
| 11. |
Tax |
Tax |
- Note: Estimates will always sync as itemized estimates to QuickBooks.
Invoice sync is dependent on multiple other data types syncing. If the following data types are not synced, invoice syncing will not work.
- Categories
- Costs
- Customers
- Projects
- Taxes
- Estimates
Projul invoice data syncs to QuickBooks Desktop fields as follows.
|
Sr. No. |
Projul Field |
QuickBooks Desktop Field |
| 1. |
Project Name |
Customer |
| 2. |
Company Name |
--- |
| 3. |
Invoice Title |
Invoice # |
| 4. |
Invoice Date |
Invoice Date |
| 5. |
Due Date |
--- |
| 6. |
Contract Details |
Terms |
| 7. |
--- |
Message on Invoice |
| 8. |
Attached Photo/Files |
Attachment |
| 9. |
Tax |
Sale Tax Rate |
- Note: Invoices will always sync as itemized invoices to QuickBooks.
Example:
The following link details how to itemize an invoice.
https://knowledge.projul.com/how-to-change-an-invoice-between-itemized-and-non-itemized
3.11 PaymentsPayment sync is dependent on multiple other data types syncing. If the following data types are not synced, payment syncing will not work.
- Categories
- Costs
- Customers
- Projects
- Taxes
- Estimates
- Invoices
Projul payment data syncs to QuickBooks Desktop fields as follows.
|
Sr. No. |
Projul Field |
QuickBooks Desktop Field |
| 1. |
Customer Name |
Received From |
| 2. |
Payment Type |
Payment Type |
| 3. |
Reference Number |
Reference |
| 4. |
Payment Amount |
Amount |
| 5. |
Payment Date |
Date |
Example:
The following link details how to add a payment to an invoice.
Invoicing: A Complete Breakdown
Questions? Let's Chat.
support@projul.com
(844) 776-5853